
Introduction
It’s been a nearly 3 months on my journey of learning kubernetes,….
One day I came across an architecture of AWS that includes AWS Cognito and ECS, if you have worked with AWS before, you would know that Cognito is a hosted authentication service which handles OAuth2/OIDC for you, To put it in a simpler way, it handles authentication and authorization to your AWS resources and provides different techniques to authenticate variying from Github, Google, etc.
Then I asked myself wouldn’t there be an open source alternative to that? Something I can play with and maybe apply to my customers’ on-premise architecture?
Well, I bet it exists.
Open Source Solution
It seems the open source community has a lot to offer in the identity management area. A quick Google search or ChatGPT prompt “open source identity & access management” will display quite a few interesting products. The list is:
Keycloak Zitadel FusionAuth Ory products
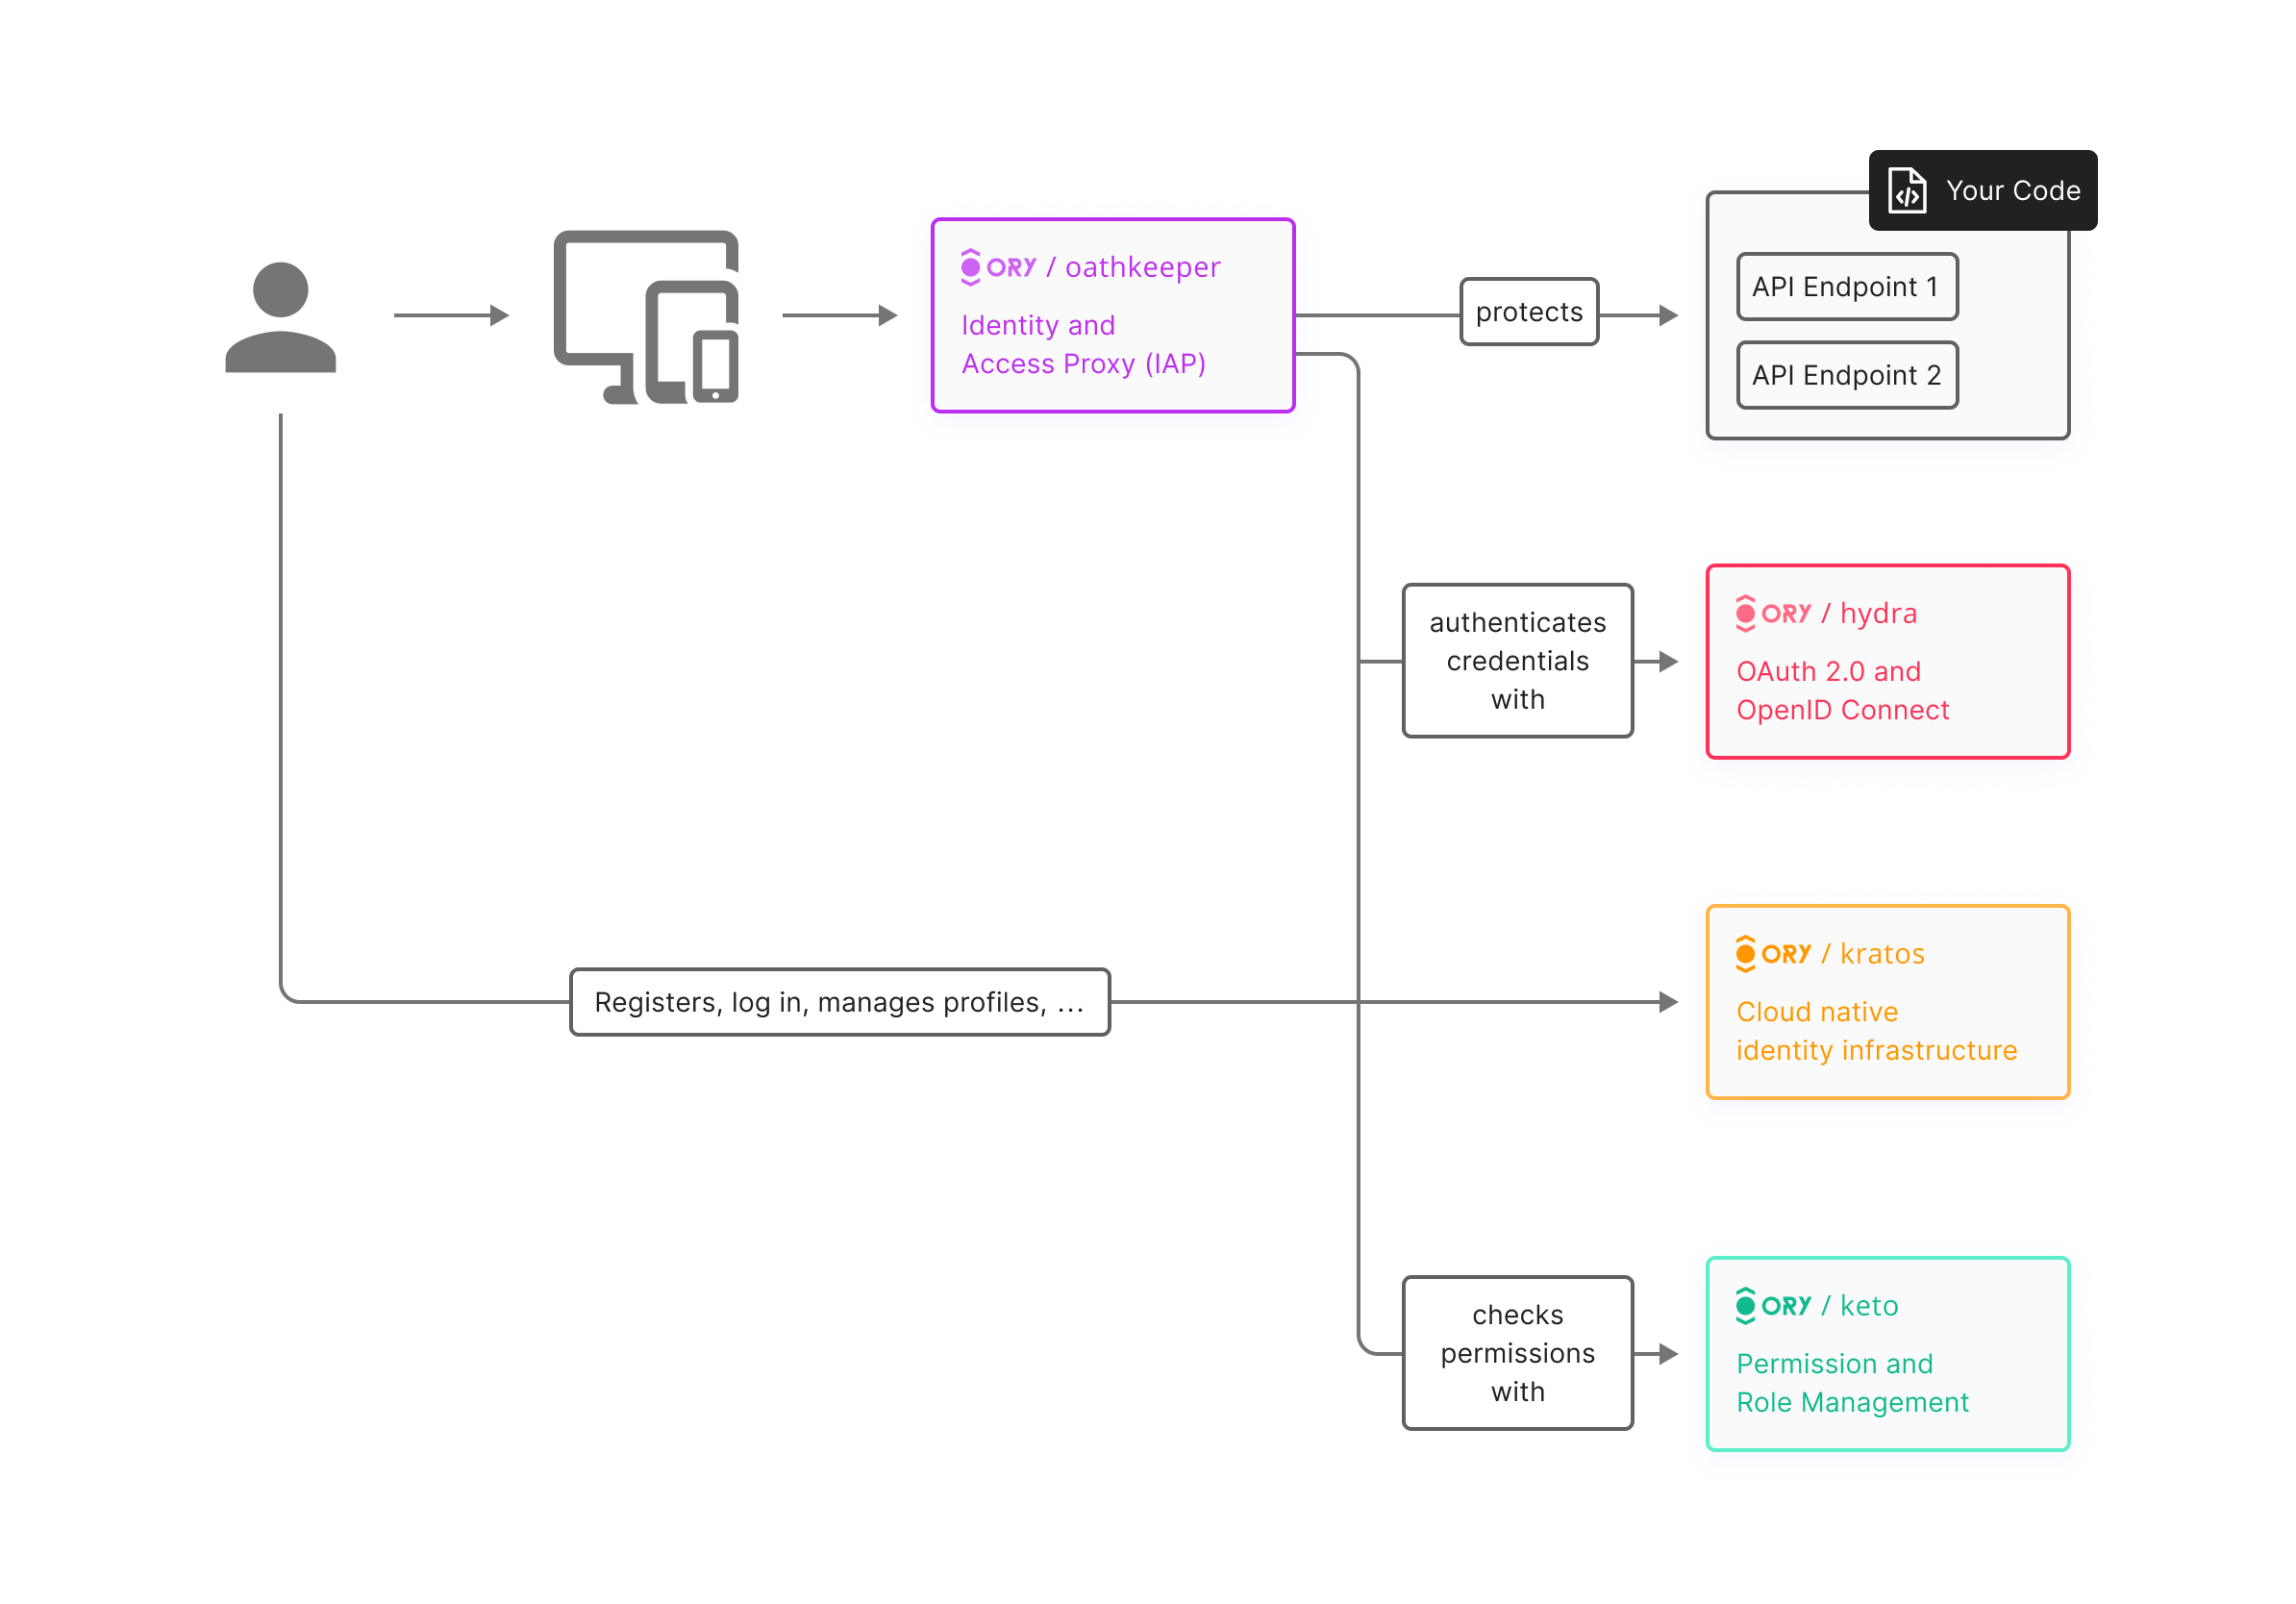
My decision was to go with “Ory open source products”. I quite liked their approach of decoupling the functionalities into separate services (Hydra, Kratos, Oathkeeper) so even if you don’t like one of their products, you can replace it with another project. The documentation was quite clear but needed some improvements, and the community was kind of active on both Slack and GitHub.
here is a diagram of ory products
Explain Different Terminologies
I have built as a backend developer an authentication and authorization mechanism integrating google, github ..etc, but this time it was different because am delegating those features into services.
I will be honest with you, learning the different terminologies (Identity management, authorization server, OIDC,Oauth2, policy as code, opaque vs jwt) wasn’t that smooth, it took me a lot of time searching through articles and asking chatGPT, until I got my final summary that goes like:
- OpenId: Is an authentication protocol, it allows an app to log into your social account, getting the desired information(email,username,image) without sharing your secret credentials(password).
- Oauth2: After proving user identity, user need somehow sort of permission of what kind of resource have access to, that part will be taken by Authorization Server(Oauth2).
- OpenId Connect (OIDC): A simple identity layer on top of the OAuth2 protocol, which allows clients to verify the identity of the end-user based on the authentication performed by an authorization server, as well as to obtain basic profile information about the end-user.
- Token(Opaque vs JWT): opaque are stored in database and when decoding they don’t contains any information, JWT in the otherside in it’s form is an user information encrypted with secret key, we use JWT for access tokens and opaque for refresh ones.
- JWK:A JSON data structure that represents a cryptographic key, used in cryptographic operations such as encryption and digital signatures. those keys used for validating JWT tokens
- Authorization server: This component will handle bothi OpenID and Oauth2 protocols
- Identity management: this entity will handle authentication and identifying user identity
- Policy Enforcement: This tool will work as proxy in front the app we trying to authenticate/authorize to, It intecept request, validate with authorizattion and then decide if user is allowed or denied.
- grant_types: there are 2 different methods authorization_code and client_credentials
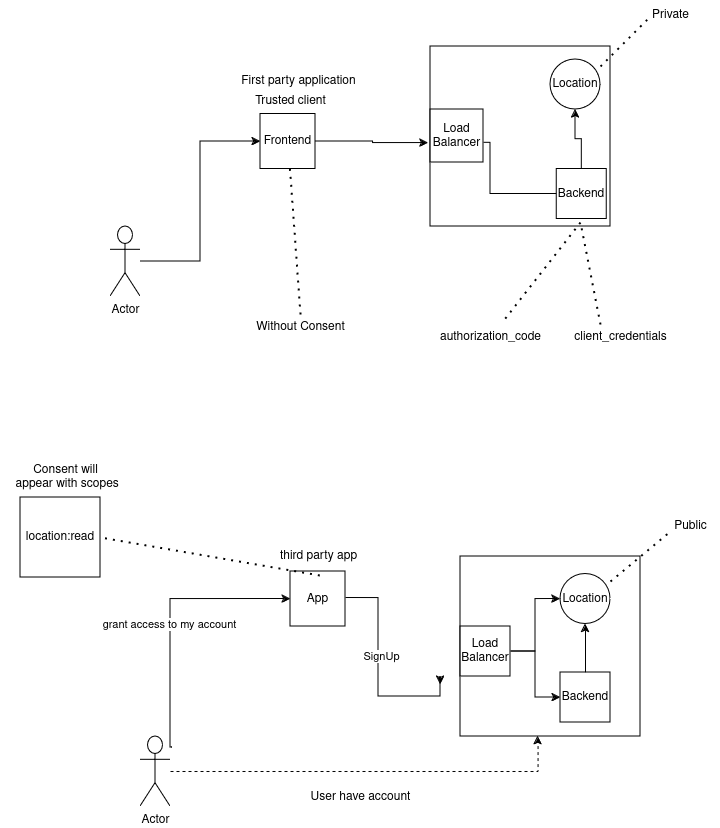
- First-party app: An application that is developed by the same organization that owns the API or resource server. It is trusted by the resource owner.
- Third-party An application developed by an external organization that seeks permission to access resources or APIs owned by a different organization.
Current Stack
I have a K8s cluster composed of three nodes (1 master, 2 control plane) with Talos as the running OS, MetalLB deployed as a load balancer combined with Nginx (nginx.io) as an ingress controller.
Ingress hosts that we will see are mapped to my Cloudflare domain(enkinineveh.space) secured with TLS certs generated using cert-manager and letsencrypt. One side note is that am using reflector to share TLS secret into other namespaces.
Helm is my favorite tool for deploying resources, Helmfile in case of deploying multiple charts, and k9s for navigating resources.
Gitea is my baby GitHub and CNPG is the default database.
Mini Project
To better understand the usability of the Ory products, we will be deploying a mini project composed of:
- A private location service that returns user location.
- Publicly accessible backend to serve the frontend and connect to private services for fetching data.
- Simple frontend for displaying information.
Some considerations on Authentication concerns:
- User registration form must be composed of: Full Name, Email, Phone Number, Password.
- Email is unique.
- Social login using Google or GitHub will be a plus. One thing to note here is that we want to redirect users to the registration form in case one of the above fields is not present on the social platform.
Some considerations on Authorization concerns:
- Requests to the location service need ’location:read’ scope to get authorized.
- We need two different clients: one for internal communication M2M, the other for communication between backend and frontend involving the user but without consent as the frontend is a first-party app.
- One beneficial step will be passing the authorized user_id as a custom header. We may provide third parties the ability to create OAuth2 apps. For the moment, we create one for them, but we want the same seamless experience as other platforms, including consent, scopes, and allowing those apps to access the location service directly as it may become public in the future.
Kratos + Custom UI
Introduction
At first, when a user tries to access a protected resource, they need to have an account or sign up for a new one and then get a token to send to the protected resource for authorizing their request.
During the phase of login/registration, an identity management system must exist to handle all that, so say welcome to Kratos.
Kratos is an identity management service that will handle all sorts of authentication methods, including login, registration, email verification, password reset, social login, etc.
But Kratos doesn’t come with a UI. Instead, it offers integration with existing UIs. You can create your pages with whatever language you like and then just reference the URLs in the Kratos config/selfservice/flows.
I’m by no means a frontend developer, so I will use this open source UI project developed by Ory. It has the majority of the functionalities that I need and we will add a couple of changes later.
Deploying
kratos has 2 components:
- Public for serving UI.
- Admin for managing identities (users) and modifying Kratos configuration (this component should be kept private for internal resources).
To facilitate deployment, we will leverage a Helm chart. A quick Helm install will configure and deploy our resources. Ory has a quite good Helm chart. We will download the chart and make a couple of modifications.
First, we will expose the public API, and the obvious approach is using Ingress, so we will change the following code under ingress:
| |
Second, kratos needs a database to store identities so we will update “config”:
| |
I created the user and db manually, take note the host is mapped to a local instance(my pg).
all things configured, now let’s deploy the chart with modified values
| |
To experience full potential of kratos, we need to integrate the UI part. We clone the project, build it and push to a registry. either you deploy it to remote a registry like docker hub or a local one, am using gitea so that will more secure and easy for me.
| |
Now the docker image is ready, let’s initialize a local helm chart for the UI.
| |
move into the values.yaml file and change the repository to the desired image in my case is gitea.enkinineveh.space/gitea_admin/kratos-ui, also don’t the forget the tag: v1
you may notice we didn’t add a domain or an ingress to access the UI, because for the UI to work it needs to be deployed under the same domain as kratos public, so our approach will be updating the previous chart of kratos and add another path for the kratos-ui.
| |
You can see I created another path “/app” for kratos-public, and leave the default “/” for kratos-ui.
One thing to notice is the annotation, I rewrite requests going to /app to / on kratos-public which means if I request /app/login on kratos.enkinineveh.space it will be forwared as /login in kratos-public.
Another thing to do is kratos need to reference the deployed UI, the known approach is updating kratos/config/flows by adding the different paths, in our case it will be like this:
| |
Cool, everything is configured let’s install the chart but this time using helmfile as we have 2 charts to maintain
| |
To apply the changes and test the UI run helmfile apply
Identity
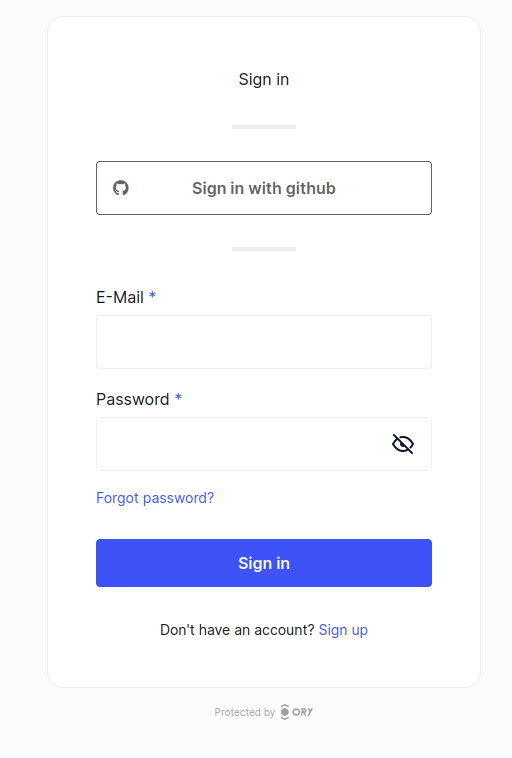
After the UI get deployed we will try create an identity, we can use the private api for admin service, but for this case we will leverage the UI part.
Heads up into kratos.enkinineveh.space and click on the signup button, registration form will appear contains email and password and if notice the url appended flow query params(was added by kratos itself).
We will extend the form and add 2 other fields(full_name, phone_number) by updating the identity.schemas param, here is the updated version:
| |
| |
We run helmfile apply to update kratos release, and then if we visit again the registration page we will notice the form get updated.
Add OIDC(Github)
Sometimes you get lazy and don’t want to type your email and use another random forgettable password, instead you choose to login with an your social accounts.
As an example let’s add github signin feature, we will need a github oauth app with read:user and user:email scopes but creating this is outside of this tutorial scope, you can follow github documentation and return back with github oauth2 app credentials.
After you get the app, you added it under selfservice/methods/oidc/config/provider[0], here is an example:
| |
the mapper_url is a jsonet file encoded base64, it extract the user information return by oidc and pass to kratos for creating identity
| |
you may notice the phone_nubmer isn’t passed from github, in that case kratos will return the user to registration to complete the missing field. and then we change kratos-ui to allow it to show the social-login button, here is the added code:
| |
build the image and push it with a new tag: v2, then update the image value on kratos-ui chart and finally run helmfile apply to update the releases.
Voila, you can see now Login/Register with Github.
Hydra
Introduction
After identifying the user, he may need to access some of our protected resources, that’s when he need to talk to an authorization server to give him token to access with it.
Hydra will act as an authorization server here. It generates, validates, and revokes tokens. Hydra and Kratos integrate well.
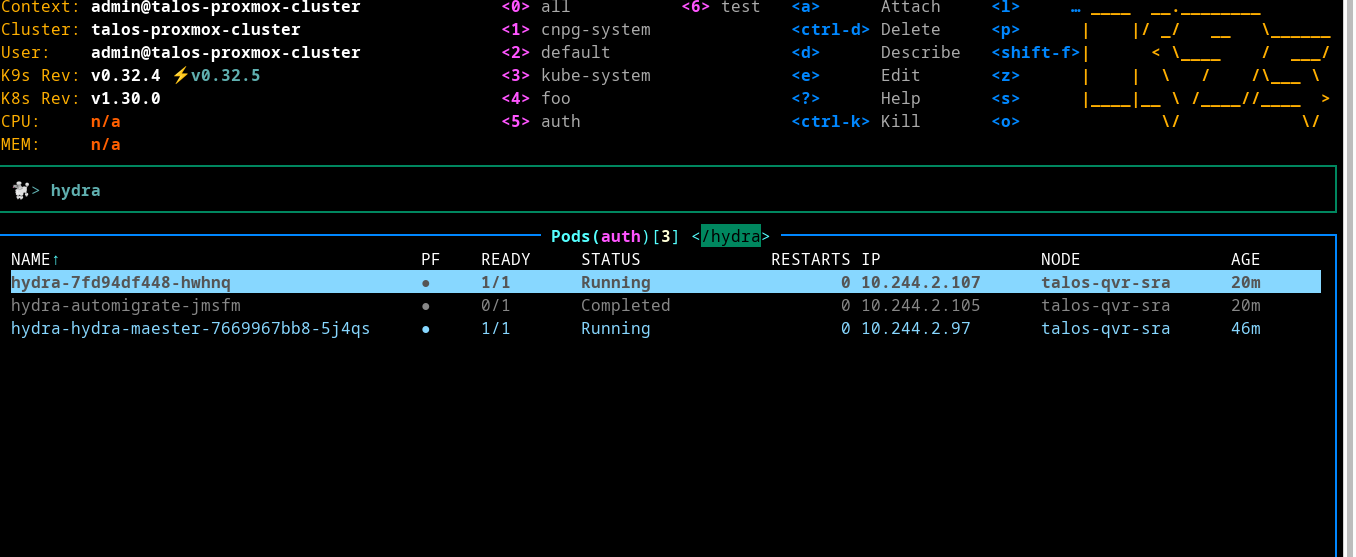
Like Kratos, Hydra contains 2 services: public and admin. Another interesting component is hydra Maester. It is a Kubernetes controller that provides CRD for simplifying the creation of OAuth2 clients, but we will ignore it in this case as we will create clients manually with the Hydra CLI.
Deploying
We will copy the same methodalogy for deploying kratos,start by downloading hydra chart values and do a couple of modifications to enable ingress and integrate with kratos,..etc.
for ingress we will enable just the public service with following code:
| |
also hydra will need a database for storing it’s own state, under hydra.config we will add dsn parameter and allow the the migration to create database and the related tables:
| |
Going forward to kratos integration part, there a property under config called ‘urls’ where we will provide a set of links referencing the login, registration, logout, consent(for showing user scopes that he will accept on) and identity_provider is the url
| |
self.issuer is important here as the created token will contains an iss field in claims
by default hydra will use opaque tokens, we will change that to JWT self defined tokens with following code:
| |
finally, we need create a secret key for encrypting user credentials, tokens,etc…
| |
Now we’are ready to deploy, we will update helmfile and run helmfile apply:
| |
Quick look at k9s, you will notice 3 pods two are active and the last one is terminated as it was initiazed by k8s job to run migration for db.
Creating Oauth2 Clients
Returning back to the project requirements, for the first use case, it enforces us into creating two different OAuth2 clients with a clean separation of concerns. That means, one for internal communication and the other one between the frontend and backend. In fact, each client must have minimal scopes and a targeted audience. For the second use case, we must create another client to handle connecting directly to the location service.
Creating clients with Hydra is a straightforward action. We can use the admin service or the Hydra CLI if you have it installed. I wanted to change the method a bit, so I went for installing the CLI and had some tinkering with it.
because hydra-admin cannot be accessed outside of cluster, I will port-forward to localhost:4445
| |
| |
| |
| |
The first client will settle between the frontend and backend. After the user registers, they don’t need to approve a certain consent because they are dealing with their own data through our trusted app. Then an authorization code will be sent to the redirect URL in the frontend and it will be sent back to the backend for access and refresh token exchange.
The second client will handle the authorization internally, meaning machine-to-machine communication. It contains the location scope to call the Location service.
The latter will be provided to third parties to get authorized for accessing user data.
Here is a demo of the current setup.
Oathkeeper
Introduction
Token doesn’t have a value if there is no validation entity, so from the project requirements, we need to enforce access to the location service to only JWTs with the ’location’scope. That being said, there are two goals we need to achieve:
- Validate tokens when the service called internaly.
- Validate tokens When location service become public and a third party needs an access to.
Oathkeeper is a PEP (Policy Enforcement Point) composed of two services: proxy and API.
The proxy service can sit in front of the protected resource, intercepting requests and then deciding based on given rules if the request should be allowed or denied. In this project, we set the redirect ingress request to the Oathkeeper proxy and then Oathkeeper decides based on the rules if it should allow or deny.
Deploying
Let’s use the same strategy we did with the previous services (Hydra, Kratos). Start by downloading the values.yaml file and make a couple of modifications to adjust for our needs.
We will keep services private and instead pass to Nginx a private domain: oathkeeper-proxy.
Oathkeeper has different handlers for authentication, authorization, mutation, and errors. To enable a specific handler, you need to define it under oathkeeper.config.
Our case requires adding authentication using JWT, authorization, logging errors as JSON, and regex for parsing rules. So here is the added code:
| |
finally update helmfile:
| |
Rules
For beginning, we will write our first rule to restrict access to the backend from the frontend side, updating oathkeeper.accessRules:
| |
and then update backend ingress to reference the oathkeeper API , here is how:
| |
Here we told nginx to forward request to oathkeeper proxy. Now let’s test the whole authentication, here is a quick demo
Mutation
One handler I didn’t mention before is mutation, the project requires we pass user_id as a header to the targeted service(backend,location) that’s where mutation handler gonna work. Let’s update the oathkeeper config
| |
then we change the rules on oathkeeper.accessRules and oathkeeper.config to add mutation
| |
| |
We can get token and request backend-test.enkinineveh.space/headers we will see USER_ID was passed
Istio Authorization
One last requirement the project needs is for the backend to get an access_token with the “location” scope and then request the location service.
To force JWT authentication in the internal services, we need a service mesh. The location deployment needs to be placed inside a service mesh and tracked by a sidecar. We’re going to choose Istio as a service mesh. The steps to integrate this feature are:
1- Add Oathkeeper Rule to handle location service access
2- Install the sidecar by labeling the deployment.
3- Use Istio meshconfig to configure an external authorizer.
4- Create an authorization policy to use the declared external authorizer and restrict deployment.
here is the access rule to force JWT with “location:read” scope to access location service
| |
I will not show you how to install Istio because this is outside the article’s scope, but you can follow their documentation; it is easy and comprehensive.
After you install Istio, to add the Istio sidecar alongside the ’location deployment’, we edit the podLabels on the location chart:
| |
Next, let’s declare the Istio external authorizer, which will call the /decisions endpoint on the Oathkeeper API to decide if requests are allowed or denied. For example, suppose the backend wants to call the Location service with the URL: http://location.auth/user_location. Then the Istio sidecar will intercept this request and forward it to the Oathkeeper API with the path “/decisions/user_location” and the host header “location.auth”. So let’s edit the Istio ConfigMap and add the Oathkeeper external provider:
| |
Finally, create an AuthorizationPolicy to use the declared external authorizer and restrict deployment:
| |
With these steps, the Istio sidecar will intercept requests to the location service and validate them using Oathkeeper, ensuring that only requests with valid JWT tokens and the correct scopes are allowed.
Third Party Client
If we need to put location service public and let third parties access it, the steps to achieve this are:
- delete Authorization Policy
- enable ingress on service
- change access rule match.url to ingress host
and that’s all, you can create a client and handle it to a third party to access your service directly
Conclusion
I appreciate your time for reading this.